](/media/header/road_start.jpg)
Introduction
After learning the basics of LIFOS and GitLab and selecting the correct template, it’s now time for you to create your first project. It is of utmost importance that, if you want to do your thesis, you are already in the group of your corresponding department before creating the project!
Creating your own project
As a reminder, the page (before you create a project) looks like this:
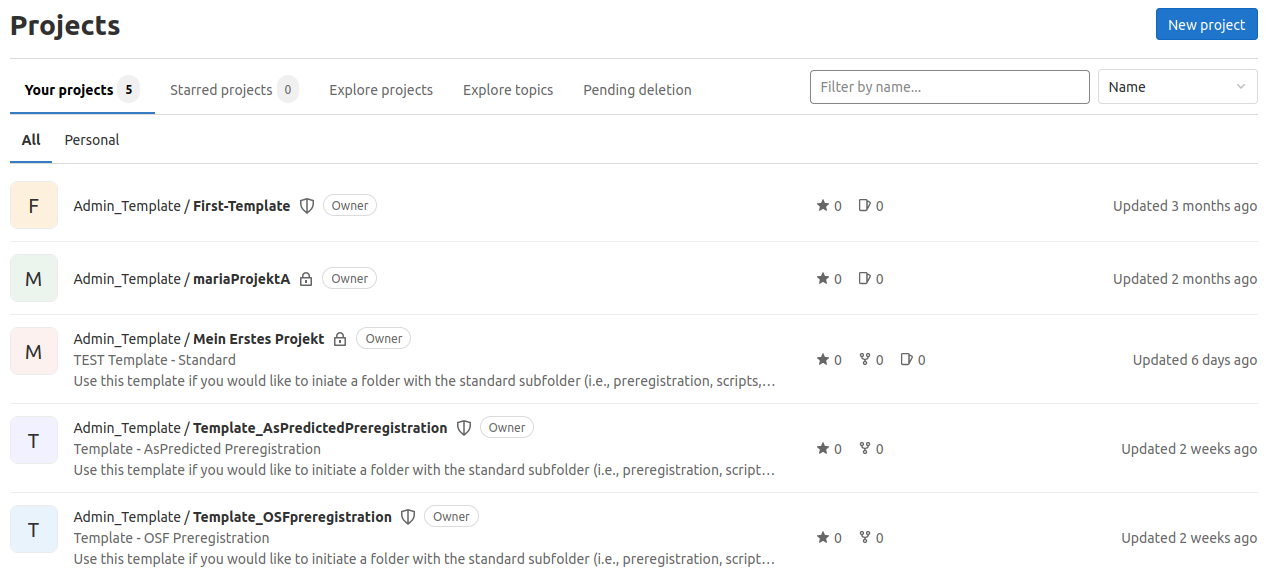
Here you can view all possible projects in your group. As you have already learned, Your Projects shows all the projects you are involved in. If you have never created a project on the server before, there will be nothing here. But you can browse projects in your group under All. Under Personal you can find your own project and under Explore you can look for all kinds of projects through the platform.
To create a project in your group, click on New Project in the top right corner.

Options to select
After that, you will be shown a page with four options: Create blank project, Create from template, import project, and Run CI/CD for external repository. As described in the other tutorials, we have prepared templates for you so that you don’t have to start the process completely from scratch.
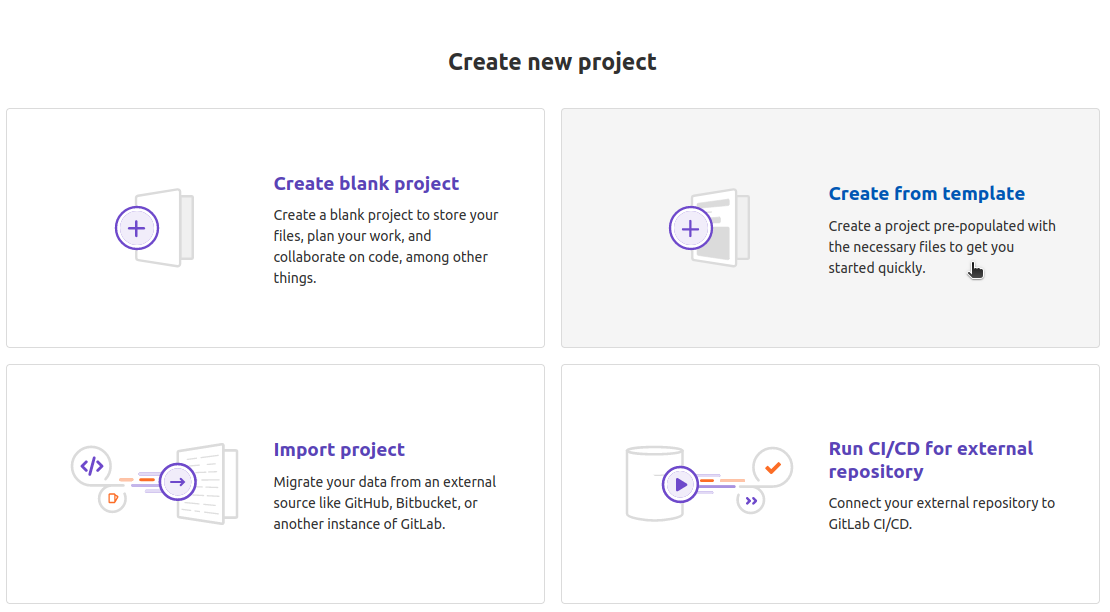
Therefore, you select the option Create from template. To access the templates relevant to you, you need to click on Instance in the following column. The Built-in templates are global templates available to any GitLab user on any instance worldwide. You can explore these another time or with a test project. But the templates you find under Instance are most important for you.

Assigning your project to your group
Now you need to select your group under the Pick a group or namespace section in the Project URL field.

Visibility-Levels
Once you have chosen the template that best suits your project, you need to give it a name. This project title should be decisive and of a content-related nature. For example, a suitable project title would be the title of your thesis. You must bear in mind that other people may become aware of your project and look at it because of the project title. Therefore, a suitable title is very important.
In theory, you also have the option to adjust the visibility level. By the latter, it is determined who can access the project and all associated files. There are three options available, one of which we have also deactivated. Nevertheless, we would like to briefly explain it. However, as the default option, you always choose internal. This is the only way to ensure internal exchange within the institute without opening up the protective space of the learning platform to the outside. If you do not want your data to be available to the instance, the data folder must remain empty. You can find more details here.
Private
If you select this option, only members of the group to which the project is assigned can access it. You should choose this option only for a test project for practicing, otherwise always choose internal.
Internal
You should always choose this option.
By selecting this option, anyone with access to LIFOS can see your project. For example, your project could be visible to others under Explore Projects. If your data allows for this setting, it is definitely the preferred approach, as open science aims to make as much as possible accessible. Within the instance, we can share our ideas best, and you can inspire future students with your work.
If you have highly confidential data, the data folder must remain empty, as otherwise it would be visible to the entire instance.
Public
You cannot select this option when creating your project, but for completeness, it is mentioned here.
With this option, the entire world could see your project because it can be accessed from outside the LIFOS site. This would leave the protected space of the exercise platform. Therefore, do not choose this option or only do so with careful consideration. For example, the project with the terms of use and the privacy policy is set to Public so that this information can be viewed before registration.
You can also add a project description. As a student in a group project, you cannot edit this yourself anymore. So make sure to choose a meaningful description right away. A subsequent change is only possible through the supervising person.
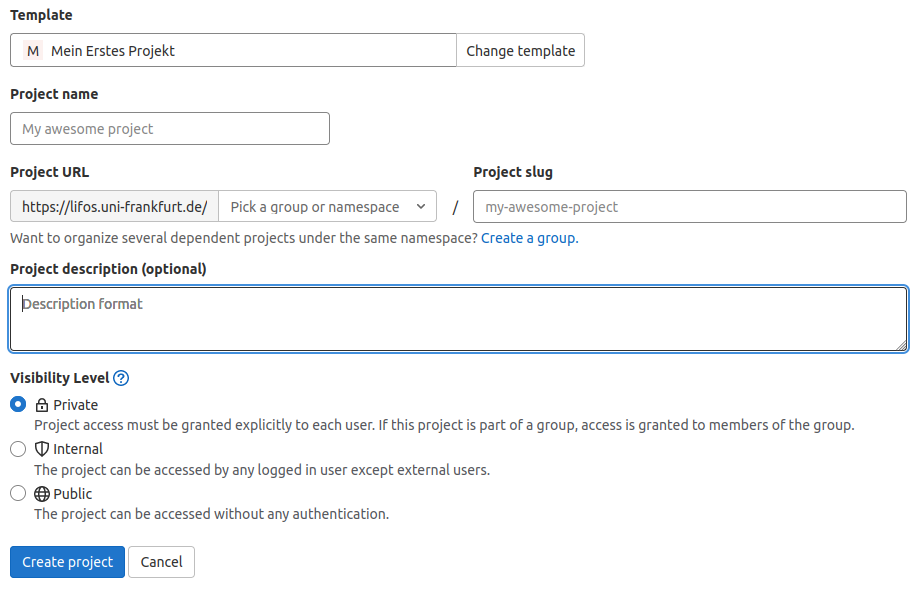
The project description should follow the following pattern: Name - Type of work - Semester or year. The following picture shows an example:

Finally, just click Create Project and you have created your first project.
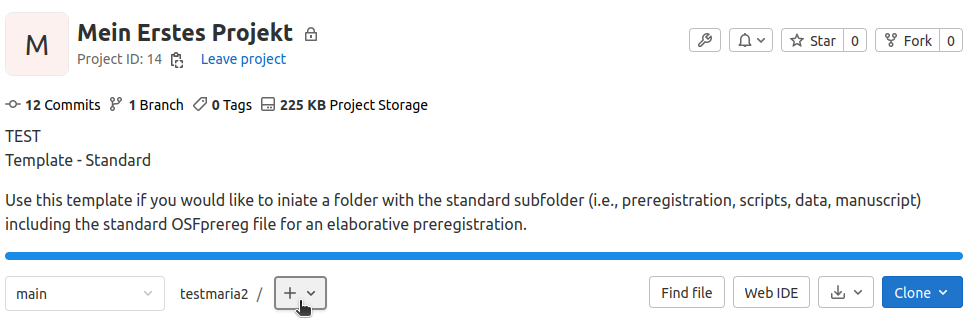
Now it should look like this:

Project - Orientation
First and foremost, the README is the most important thing for you. Here you will find all the important information about the template. You can find it by simply scrolling down on your project page.
In addition, you will find various folders that are intended to provide you with guidance on what you will need, such as preregistration, scripts, etc. These are of course still in the standard format and not yet filled. You will need to fill them with files and modify them as necessary.
Upload files
Note: If you want to upload your data, please read our privacy section first to make sure that your data meets the necessary anonymity!
Let’s start with an explanation of how to upload files to the repository. We assume that you have created or modified a file on your computer that you now want to add to your project. To upload it, go to the home page of your project on LIFOS and click on the plus button.

A list of options will appear. Let’s say we want to upload a file called “Datenauswertung.R”. We simply click on Upload File. Then you can easily insert the file using the drag-and-drop principle. You will also be prompted to write a commit message so that you will know later what you did or your group members can see what the new file is. This message should be short and informative and should include the name of the file you changed, such as “Add Datenauswertung.R to 2_Scripts”. It is important, that your target branch remains as main!
What is a Commit?
As we have already described, LIFOS is a GitLab instance. Uploading and modifying files in the Git universe is processed in a commit. GitLab and Git manage versions of files, and each of these versions is stored within a commit in a repository - commits thus contain a copy of the version of each file.


If you want to create a file directly in a folder, you must first open the desired folder and then repeat the same procedure as above.

We did not upload our file to a folder, but directly to the “homepage” of our project. In retrospect, we realize that the file should have been better placed in the “Scripts” folder. Normally, you would now move the file, but this is not possible on the browser version of GitLab. The only way to get the file into the folder is to delete it first and then upload it again. A more convenient option is provided by SmartGit. With SmartGit, you can greatly simplify your work with GitLab. After you have finished reading this tutorial (recommended!), you can learn more about SmartGit here.
If you accidentally upload the same file twice, you will receive a warning message:

Editing files
As you may have noticed, after initializing the project, a file has already been added to your project - the “README.md”. This is what you see when you scroll down to your project.
First of all, there is an overview of the project structure of the respective template, as well as a to-do list with the next steps for you. However, you can also write something about your project in the “README.md”, such as a summary or the goals of your project.
To edit the “README.md”, click on the file. Then a new window opens, where you click on Open in WebIDE.

However, the Web IDE cannot display all file formats. It works for .txt, .rmd, .R, or .md, but if you try to open a Word file or OpenOffice file, it won’t work.
You can view the previous version of your file under “History”.

Here you find all old versions of your file.

Delete files
First of all you have to click on the file and you’ll see the Delete-Button.

Now we can upload the files into the right folder.

As you can see “Datenauswertung.R” is now in the right folder.
Changing folder structure
A lot of effort and feedback went into creating the templates so that you can find all the necessary folders in the project directly when selecting a template. At the same time, we cannot guarantee that it will fit perfectly in every case. Therefore, here is a brief description of how you can add or delete folders.
Create a folder
For demonstration purposes we’ll create a test folder. For this, we go to the homepage of our project and click on the “+” button:
Then, a toggle-down list opens and we need to click on New Directory. Directory is the translation of the term folder that we know.

Now you give this folder a name (e.g., “Test Folder”) and an appropriate commit message.
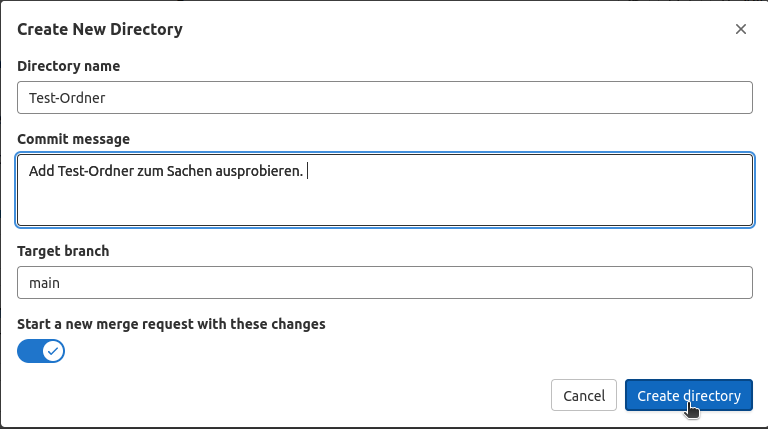
Then, after making sure that you chose main as your target branch, you have to click on Create Directory, and you have created a new folder! You can find it on the homepage of your project.
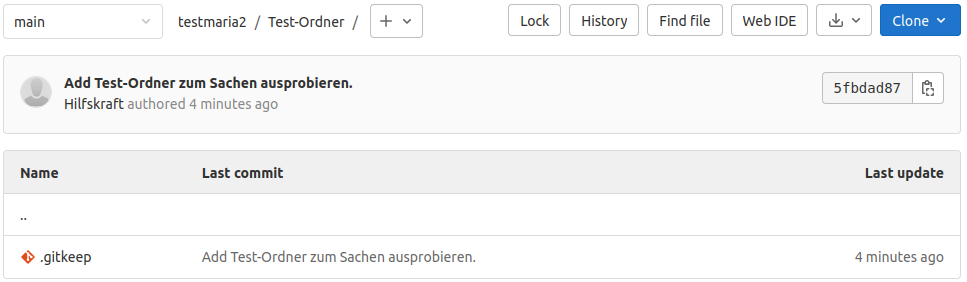
Delete a folder
Sometimes a folder is unnecessary from the beginning, or it becomes clear over time that no information is stored there. For a tidy project, it would be useful to remove unnecessary folders from the structure. We will now demonstrate the procedure on our test folder. In GitLab, deleting works only if all files in the folder are deleted. Currently, only the “.gitkeep” file is in our folder. The “.gitkeep” file is an otherwise empty file that is simply there to keep otherwise empty folders or repositories alive. According to GitLab logic, empty folders would otherwise be deleted immediately, and one would have to fill the folder with at least one file during initiation.
You open the folder (if you haven’t already done so) and click on this file. Then you just have to click on the Delete button.

After you have deleted the last file in your folder (in this case, “.gitkeep”), the folder will automatically disappear from your project.
Delete a project
As we have already described in the intro to LIFOS, it is generally not possible for students to delete a project that belongs to a group. This is to prevent errors. If deletion is still necessary, please contact your supervisor or the central support of LIFOS.
Instructions on how to delete your own projects (i.e., those without group affiliation) are described in the tutorial for the advanced Markdown exercise, which you can find here. However, a brief introduction to Markdown with descriptions of the most important functionalities is also provided here.
Basic Markdown Functionalities
In the context of LIFOS, Markdown is important because the README in your project is/will be written in it. Since the README presents your project, it is important that you can make it as appealing as possible. Markdown is a markup language that is relatively easy to use because of its simple syntax. A major advantage of Markdown is that you can write a simple text file that can then be converted into various document types (such as HTML, PDF, or even MS Word). Thus, people on different operating systems can easily collaborate on Markdown files. We will first show you the most important syntax that could be relevant for your README. Some of the commands mentioned here can also be found on the Markdown Cheat Sheet.
Italics and Bolds
If you want to emphasize certain words, it is important to know how to use italics and bold. The tutorial will be structured so that first, the Markdown representation will always be shown, followed directly by the code for it.
italic:
*italic*
bold:
**bold**
Both together through several words:
*Both together* **through several words**
at the same time!:
#You can subsitute * with _ in either case! _ just behaves differently within a word (a_b_c stays a_b_c, but a*b*c makes the b italicized!)
**_at the same time!_**
HEADER
Headers are very important for formatting your documents, as they allow you to define different levels within the file and draw attention to a particular section. There are six different headers that differ in size.
This is a Type 1 Header
# This is a Type 1 Header
Type 2
Type 3
Type 4
Type 5
Type 6
## Type 2
### Type 3
#### Type 4
##### Type 5
###### Type 6
As you can see, the headers differ only in the number of # tags. It’s important to pay attention to the space between the # tags and your header, otherwise it won’t be formatted correctly.
Links
In this section, you will learn how to create links to another website or set your own anchors (linking to text in your document).
[Visit the LIFOS-Server!](https://lifos.uni-frankfurt.de/users/sign_in)
In the square brackets, you can write a short text describing where this link leads. Afterwards, in the round brackets, you can provide the actual link to the website. Of course, all of this can also be integrated into the text if you want to mention a website like LIFOS.
...a Website like [LIFOS](https://lifos.uni-frankfurt.de/users/sign_in) erwähnt.
Also interesting: You can also create reference links to other parts of your file. For example, you can refer to a specific section, such as the current heading.
...such as the current [heading](#links).
In the square brackets, you again specify what you are referring to, and in the round brackets, a tag. Headings tend to generate tags automatically in markdown, which are named the same as the heading itself. These tags start with a #. You can alos define the tag yourself by using curly brackets after the heading in the following manner: {#NameOfTag}.
If your heading consists of multiple words, such as Italic and Bold, then you need to link it as follows:
...such as [Italic and Bold](#italic-and-bold)..
`
`{=html} The tag is case-insensitive, and there is always a “-” between the words when automatically generated, to replace the spaces. If you use RMarkdown / Pandoc though, the automatic tags are actually case sensitive. It is therefore generally recommended to just refer to tags in lowercase.
Of course, you can also set your own anchors within a text by using the HTML tag “” with a name attribute (e.g. “anchor-point”).
<a name="anchor-point"></a>
The text you want to link to is written under this expression. It can be located anywhere in the document.

Now, here is the link text:
...you can also set your own [anchors](#anchor-point).
As you can see, it is important to pay attention to the name attribute (here: anchor-point), especially to ensure that it is identical in both your link and the linked anchor. Otherwise, the link won’t work.
Pictures
You can also insert images using Markdown. This works similar to links.
Here is an image of cute animals

The difference to a link is that an exclamation mark “!” is added before the whole expression, followed by a text that is shown when hovering with the mouse over the picutre, followed by the image link. Be careful to only use copyright-free images and give credit where it is due.
If you want to link an internal image instead of an external one, you need the file path to that image in your repository.

This image link should be relative to the location of your Markdown file (e.g. the ReadMe). Let’s say you uploaded the image in the folder “3_Data”. Then the image link would be as follows:

If the image is located in a subfolder “subordner”, the link would be as follows:

Of course, you would replace “image.jpg” with your actual image file name.
Lists
There are two types of lists: ordered and unordered lists.
- This
- is
- not
- in order.
* This
* is
* not
* in order.
- This
- is
- in
- order.
1. This
2. is
3. in
4. order.
If you want to create a more structured or complex list with indentations, you need to indent the list marker so that it aligns with the first letter of the word, one line above.
- but
- never
- too many indentations.
- never
* but
  * never
    * too many indentations.
Otherwise, it quickly becomes confusing.
If you want to practice creating a document with Markdown, you can find instructions here.
Conclusion
This tutorial has explained how to create a project and edit files and folders in it. However, you have probably noticed that there are many other functions and possibilities for working with GitLab and the LIFOS server. You have also learned the basics of Markdown. To make your work with GitLab easier, you can check out the SmartGit tutorial. You can find it here. A more in-depth introduction to GitLab is currently under construction.
Help
What can I do if I accidentally commited to a branch that is not main?
You can push your changes from the wrong branch to main and delete the accidental branch (if it was created on accident) in a few easy steps.
First, enter your project and click on the merge request symbol to the left.
Your changes on other branches should be visible as a merge request.

If you now click on create merge request a new window should open up
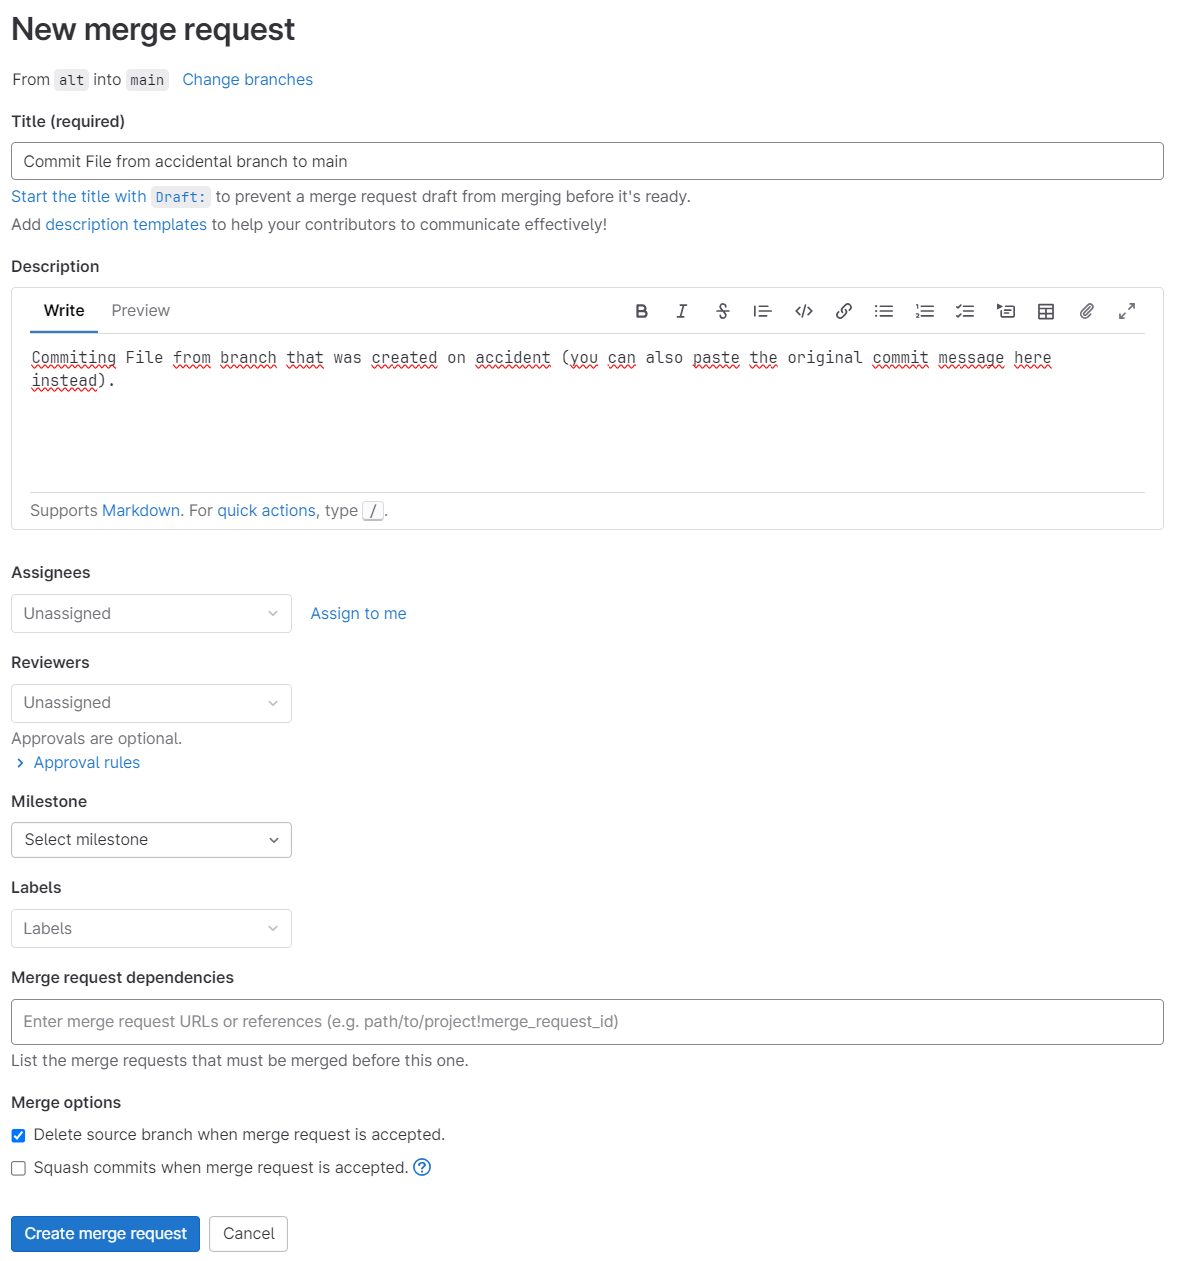
Here you now enter a title and description for your merge which should properly explain why and what you are merging from a different branch.
Afterwards, check the merge option Delete source branch when merge request is accepted if you intend to delete the branch onto which you accidentally commited your changes instead of main and press Create merge request.
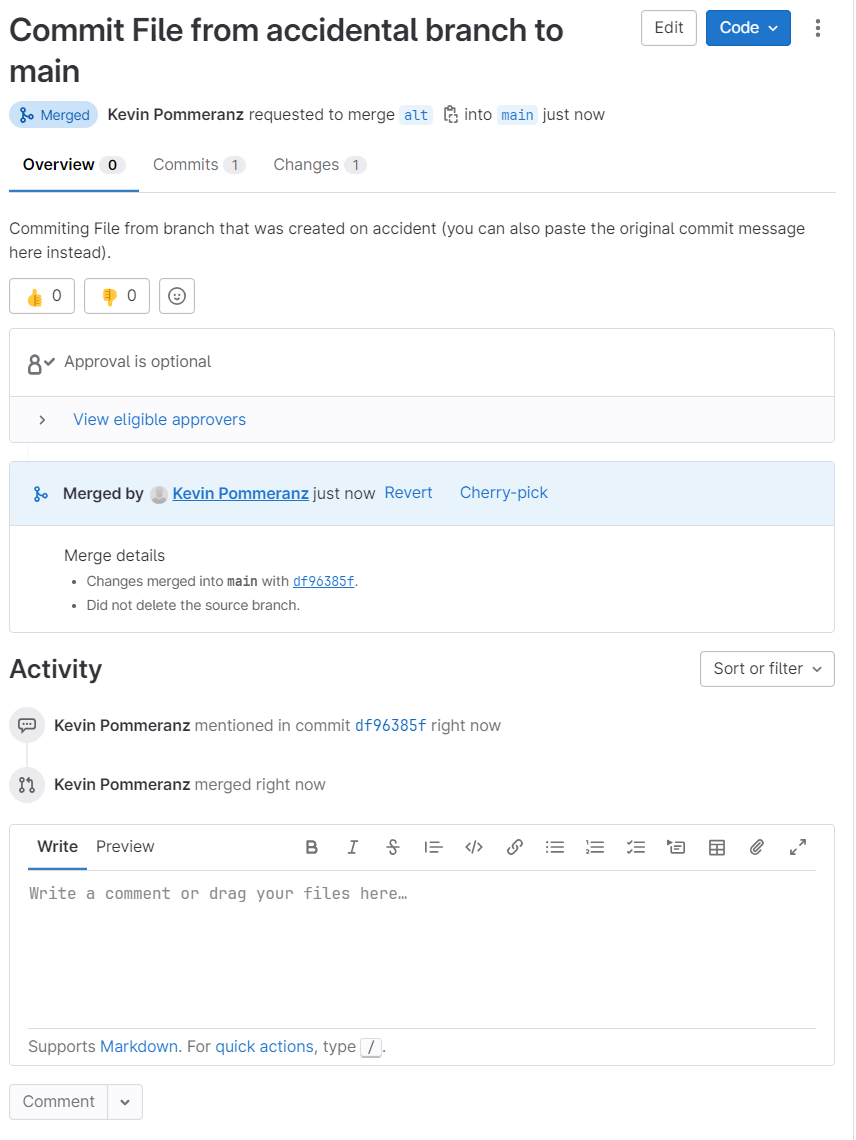
You will now land on a new page.
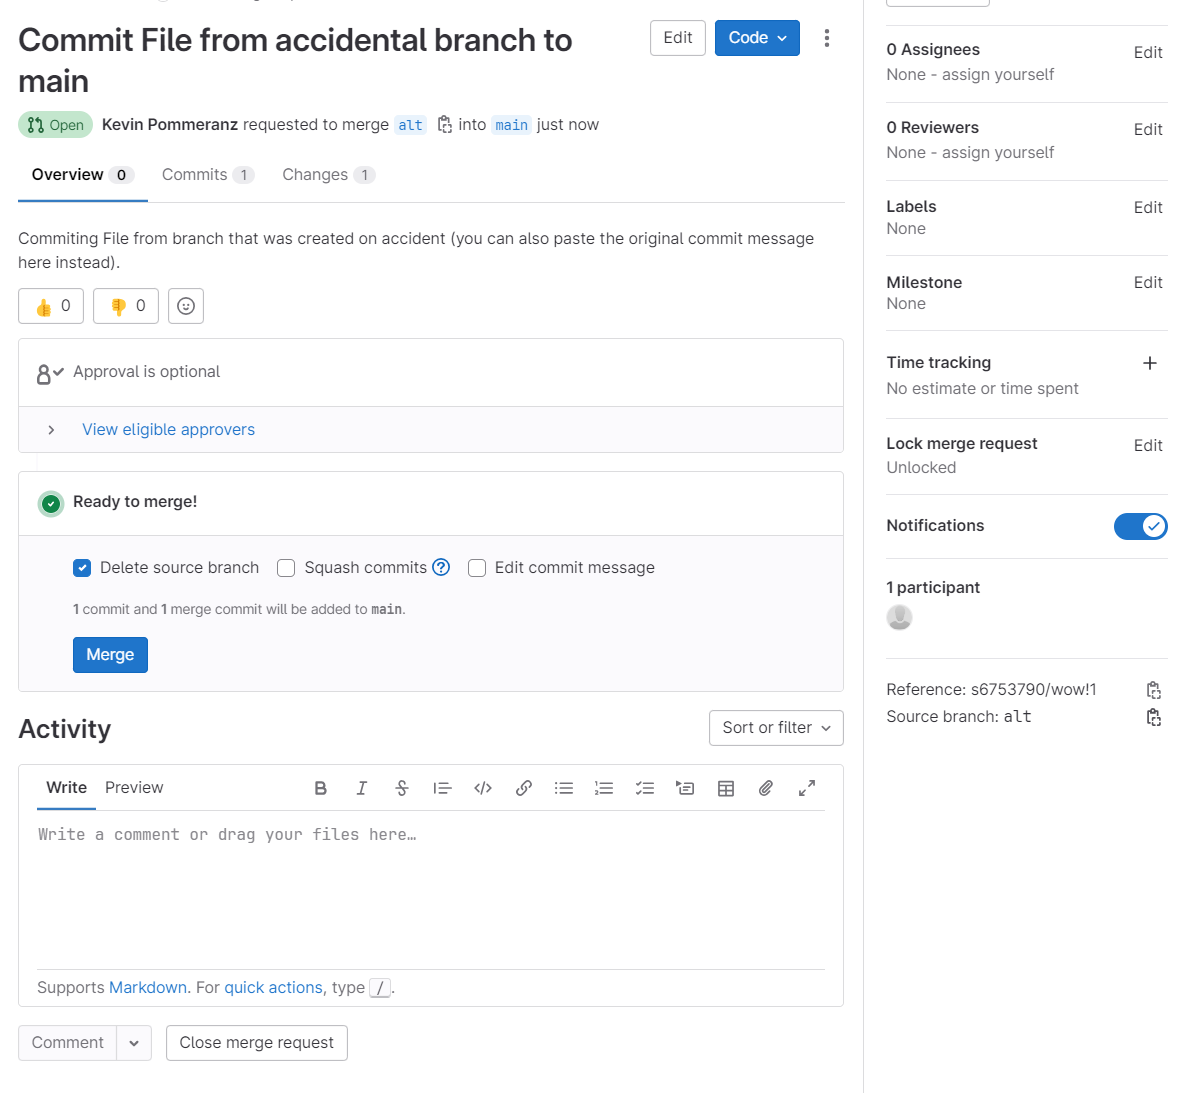
Now you need to confirm your merge and the squashing of the source branch from which you are merging once more by clicking the Merge-button.
After a short moment, you should now see that your merge suceeded!
If that is not the case, or you got stuck elsewhere in the process you can contact LIFOS[at]uni-frankfurt[punkt]de instead.